
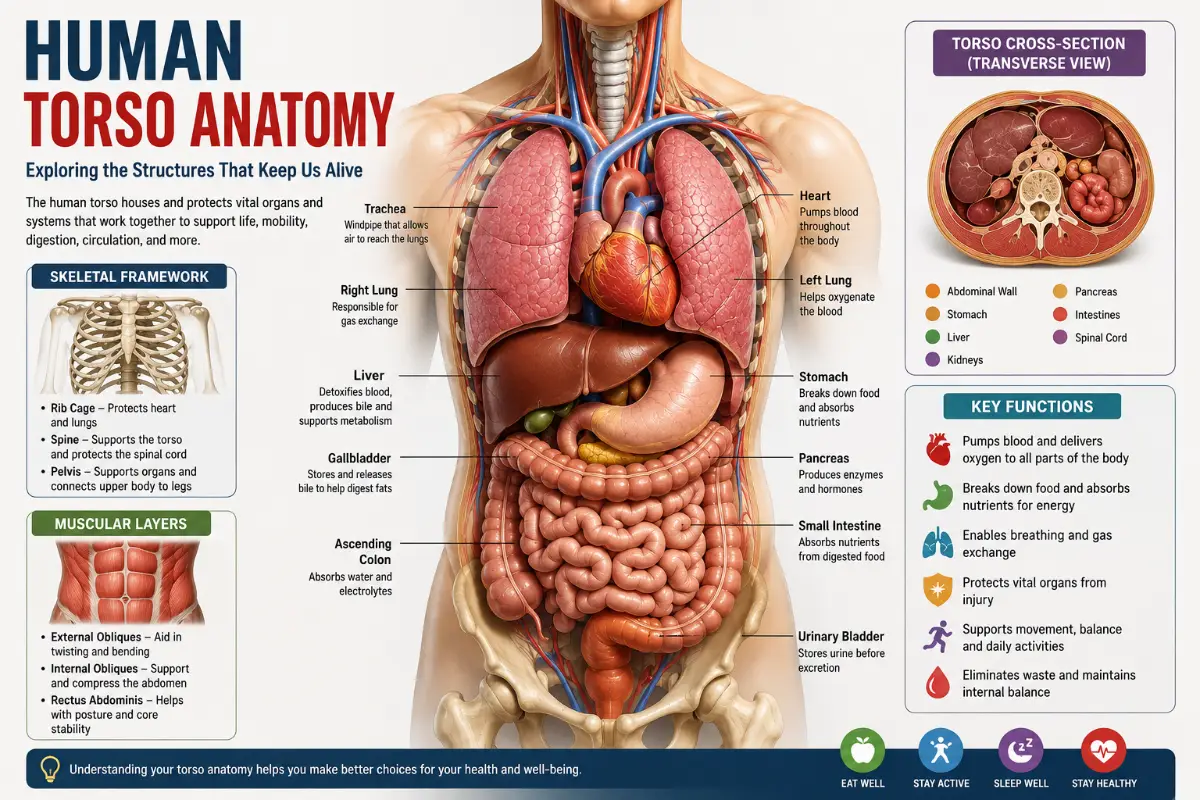
Human torso anatomy for artists is easiest to understand when you stop treating the torso as one complicated shape and instead build it from a few connected forms: the rib cage, pelvis, spine, shoulder girdle, and surrounding muscles.
For drawing, the rib cage and pelvis are especially useful as large three-dimensional masses. The rib cage establishes the volume of the chest, while the pelvis provides a second structural mass below it. The spine connects these structures and allows the torso to bend, twist, compress, and extend. The goal isn’t to memorize every muscle. It is to understand the forms underneath the surface, identify reliable landmarks, and use those structures to construct the figure from different angles.
Human Torso Anatomy: The Basic Structure
The torso is the central region of the body between the neck and pelvis. Anatomically, it contains the thorax, abdomen, pelvis and back structures.
For artists, however, a simplified construction model is often more useful.
Think of the torso as:
Rib cage → flexible waist/spine → pelvis
The rib cage is a rounded, three-dimensional structure formed by the ribs, sternum and thoracic spine. The pelvis is a complex bony ring that can be simplified initially as a block, bowl, or wedge.
The spine links the upper and lower masses and gives the torso its ability to change position.
This approach is consistent with common figure-drawing instruction, where artists study the rib cage and pelvis as major forms before adding surface muscles.
Also Read: Tubby Todd Review: Is It Worth It for Baby Skin Care?
The Rib Cage: The Upper Torso’s Main Mass
The rib cage is one of the most important structures to understand when drawing the torso.
It consists of:
- 12 pairs of ribs
- Sternum
- Costal cartilages
- Thoracic vertebrae
For drawing purposes, you don’t need to draw every rib. Instead, imagine the rib cage as a rounded, compressed volume.
A useful simplified shape is:
- wider around the upper chest
- curved through the sides
- narrowing toward the lower rib margin
- connected to the spine at the back
The exact shape changes with the person’s body type, breathing, posture and pose.
The Rib Cage as a 3D Form
Rather than drawing a flat oval, imagine the rib cage as a volume with:
- front plane
- side planes
- back surface
- central axis
- upper opening
- lower costal margin
A center line running over the rib cage helps show whether the chest is facing toward, away from, or across the viewer.
This becomes particularly important when drawing a twisted torso.
The Pelvis: The Lower Structural Mass
The pelvis provides the second major construction mass.
It consists of the:
- Ilium
- Ischium
- Pubis
- Sacrum
- Coccyx
For a simplified drawing, the pelvis can initially be treated as a box, bowl, wedge, or tilted block.
The important thing is not the exact simplified shape. It is the ability to show:
- its direction
- its tilt
- its rotation
- its relationship to the rib cage
- its connection to the legs
If the rib cage faces one direction while the pelvis turns another, the torso immediately becomes more dynamic.
Rib Cage and Pelvis: The Key Relationship
One of the most useful ideas in figure drawing is to compare the orientation of the rib cage with the orientation of the pelvis.
Neutral pose
The two masses may appear relatively aligned.
Tilted pose
One mass may angle higher on one side.
Twisted pose
The rib cage can rotate in a different direction from the pelvis.
Contrapposto
The body’s weight distribution can create opposing tilts through the shoulders, rib cage and pelvis.
This relationship is more useful for artists than memorizing isolated muscle shapes.
Read More: Emergency Dentist: When to Get Same-Day Dental Care
Important Torso Landmarks for Artists
Bony landmarks help artists construct the figure because they provide fixed reference points beneath changing soft tissue.
Important landmarks include:
- Clavicles
- Sternal notch
- Sternum
- Sternal angle
- Xiphoid process
- Coastal margin
- Navel
- Iliac crest
- Anterior superior iliac spine (ASIS)
- Sacrum
- Scapula
- Vertebral spinous processes
These landmarks do not all appear equally clearly in every body or pose. Their visibility changes with body composition, lighting, age and movement.
Front Torso Landmarks
Clavicles
The clavicles form the bony framework across the upper chest.
Artists can use them to establish:
- shoulder direction
- chest orientation
- neck-to-shoulder transition
They are especially useful when the torso is turned.
Sternum
The sternum forms the central bony structure of the front chest.
It helps establish the body’s central axis.
Sternal Notch
The suprasternal notch is the depression at the top of the sternum between the clavicles.
It is a useful reference point for positioning the upper torso.
Xiphoid Process
The xiphoid process forms the lower end of the sternum.
For artists, it can help locate the transition from the central chest toward the upper abdominal region.
Coastal Margin
The lower edge of the rib cage creates an important transition between the chest and abdomen.
Its curve is particularly useful when constructing the torso from the front or side.
Back Torso Landmarks
A convincing torso drawing also requires knowledge of the posterior structure.
Important landmarks include:
- Scapula
- Spine of the scapula
- Vertebral column
- Spinous processes
- Sacrum
- Iliac crest
- Posterior rib cage
The scapulae, or shoulder blades, are especially important.
They move across the back rather than behaving like fixed plates. Their position changes when the arms move, which means the back silhouette can change dramatically between poses.
The Main Muscles Artists Should Understand
You don’t need to memorize every muscle to draw a convincing torso.
Focus first on muscles that significantly affect the visible surface.
Pectoralis Major
The pectoralis major forms much of the visible chest mass.
Its shape changes with:
- arm position
- shoulder rotation
- muscle development
- body composition
Rectus Abdominis
The rectus abdominis runs vertically along the front of the abdomen.
Artists often overemphasize the individual abdominal segments. In a finished drawing, the underlying mass and lighting usually matter more than outlining every “six-pack” division.
External Oblique
The external oblique contributes strongly to the side contour of the abdomen.
It helps create the transition between:
rib cage → waist → pelvis
Serratus Anterior
The serratus anterior sits along the lateral rib cage and interacts visually with the ribs and scapula.
Its visible form is particularly useful when drawing lean figures or highly developed musculature.
Latissimus Dorsi
The latissimus dorsi creates a major portion of the lateral and posterior torso.
It contributes to the characteristic widening of the upper back toward the shoulders and arms.
Trapezius
The trapezius extends across the upper back and neck region.
It affects:
- neck-to-shoulder transition
- upper-back silhouette
- scapular movement
Erector Spinae
The erector spinae group runs along the vertebral column.
In figure drawing, it contributes to the vertical forms on either side of the spine.
Male and Female Torso Anatomy for Artists
Artists often study sex-related anatomical differences because they influence silhouette and proportion.
However, these should be treated as general tendencies, not rigid drawing templates.
Pelvic morphology differs on average between male and female skeletons, including differences in pelvic width, shape and subpubic angle.
For drawing, useful visual tendencies can include:
Typical male pattern
Often characterized by:
- relatively broader shoulders
- comparatively narrower pelvis
- greater upper-body mass in many individuals
Typical female pattern
Often characterized by:
- relatively broader pelvis
- different pelvic proportions
- greater average contrast between waist and hip width in many individuals
But these patterns overlap considerably.
Do not draw every male figure as an inverted triangle or every female figure as an hourglass.
Body type, age, training, genetics, posture and individual anatomy can change the silhouette substantially.
The best practice is to use these patterns as observational starting points rather than rules.
Torso Proportions: How Artists Should Use Head Units
Head units are a drawing convention, not a biological constant.
Artists may use the head as a measuring unit when constructing a figure. Different systems use different total body proportions, and real people vary substantially. Current figure-drawing resources commonly teach multiple proportional systems rather than one universal measurement.
For the torso, the useful approach is to establish relationships between landmarks rather than memorize one number.
Useful checkpoints include:
- base of neck
- sternum
- rib cage
- navel
- iliac crest
- pelvis
- pubic region
Important rule
Measure the reference in front of you.
Don’t force the model to match a memorized proportion chart.
Read More: Smith Machine: Mistakes, Fixes, and Smarter Training Strategies
A Better Way to Measure Torso Proportions
Instead of asking:
“How many heads is the torso?”
ask:
“What is the relationship between the rib cage, waist and pelvis in this particular figure?”
Compare:
- shoulder width
- rib cage width
- waist width
- pelvic width
- torso height
- rib cage-to-pelvis distance
This produces a drawing that follows the actual model rather than an idealized mannequin.
Drawing the Torso From the Front
Start with the major forms.
Step 1: Establish the gesture
Draw a light line showing the overall action of the pose.
Step 2: Place the rib cage
Construct the rib cage as a three-dimensional mass.
Don’t draw the muscles yet.
Step 3: Place the pelvis
Add the pelvis as a separate tilted mass.
Step 4: Connect the masses
Use the spine and abdominal region to connect the rib cage and pelvis.
Step 5: Add landmarks
Place:
- clavicles
- sternum
- navel
- iliac crest
- major shoulder landmarks
Step 6: Add large muscle forms
Introduce the pectorals, abdominal wall, obliques and major back structures.
Step 7: Refine the silhouette
Only now should you spend time on surface details.
Drawing the Torso From the Side
The side view reveals relationships that can be hidden in a front view.
Look for:
- rib cage depth
- spinal curve
- abdominal projection
- pelvis tilt
- chest-to-back relationship
- gluteal mass
- neck position
The torso should not be treated as a flat rectangle.
It has substantial depth from front to back.
Drawing the Torso in a 3/4 View
The three-quarter view is one of the most useful angles for studying torso anatomy because it reveals both front and side planes.
Start by establishing:
- Central axis
- Rib cage volume
- Pelvis volume
- Spine direction
- Shoulder line
- Pelvis tilt
- Major landmarks
Then check how much of each side of the torso is visible.
The near side will generally occupy more visual space than the far side because of perspective.
Torso Rotation and Twist
A torso becomes more believable when the artist understands that the rib cage and pelvis don’t always point in the same direction.
For a twisting pose:
- rotate the rib cage
- rotate the pelvis independently
- connect them through the spine
- compress one side
- stretch the opposite side
- adjust the surface muscles around the changing forms
This is more effective than simply drawing a curved “S” outline.
The underlying masses must support the gesture.
Foreshortening the Torso
Foreshortening occurs when the torso points toward or away from the viewer.
The apparent length of the torso decreases as its depth becomes more prominent.
For example, when a figure bends forward toward the viewer:
- the near rib cage may become visually larger
- the abdomen can compress
- the pelvis may overlap the torso
- distant structures become smaller
- normal proportion measurements become less visually useful
This is why artists need to understand three-dimensional construction, not just front-view anatomy.
Artist-focused anatomy instruction commonly emphasizes perspective and foreshortening alongside proportions and construction.
Gesture, Weight and Contrapposto
Anatomical accuracy alone does not create a convincing pose.
The torso must also communicate:
- direction
- balance
- compression
- extension
- weight distribution
In a contrapposto pose, the pelvis and rib cage may tilt in different directions while the spine and surrounding muscles adapt to the position.
Start with the gesture and major masses before rendering anatomical details.
Common Torso Drawing Mistakes
1. Drawing the torso as one shape
The rib cage and pelvis should be understood as separate masses.
2. Making the torso perfectly symmetrical
Real poses often contain asymmetry.
3. Drawing muscles before structure
Muscles cannot rescue incorrect proportions.
4. Ignoring the back
The scapulae, spine and latissimus dorsi strongly influence the torso’s form.
5. Using fixed proportions
Head-unit systems are guidelines.
Reference should override the formula.
6. Drawing every anatomical line
More lines do not automatically mean more anatomy.
Use only the forms that help explain the volume.
7. Ignoring perspective
A torso viewed from above or below will not maintain the same apparent proportions as a straight-on view.
8. Treating gender as a rigid template
Individual variation is too large for binary silhouette formulas to describe every person accurately.
9. Forgetting the pelvis
A torso with a correctly drawn rib cage but poorly constructed pelvis will usually feel unstable.
10. Starting with details
Build:
gesture → masses → landmarks → muscles → surface detail
rather than reversing that order.
A Simple Torso Construction Workflow
For repeated practice, use this sequence:
1. Gesture
Capture the overall action.
2. Rib cage
Establish the upper torso volume.
3. Pelvis
Establish the lower structural mass.
4. Spine
Connect and orient the two masses.
5. Shoulder girdle
Place the clavicles and scapula-related structures.
6. Landmarks
Mark the sternum, navel, iliac crest and other useful reference points.
7. Major muscles
Add the pectorals, abdominals, obliques, trapezius and latissimus.
8. Silhouette
Correct the outer contour.
9. Perspective
Check depth, overlap and foreshortening.
10. Surface detail
Add only the anatomical information needed for the drawing.
How to Practice Human Torso Anatomy
Don’t practice only one front-facing pose.
A better study set includes:
- Front view
- Back view
- Side view
- 3/4 front
- 3/4 back
- Torso twist
- Forward bend
- Backward extension
- Raised arms
- Compressed pose
- Foreshortened pose
For each drawing, identify the rib cage, pelvis, spine and major landmarks before adding muscles.
Artist anatomy resources similarly emphasize studying the torso through multiple views and connecting skeletal structure with muscular form.
Human Torso Anatomy for Artists: Quick Reference
| Structure | What Artists Should Observe |
| Rib cage | Overall volume, tilt, width and depth |
| Sternum | Central front axis |
| Clavicles | Shoulder and upper-chest direction |
| Scapulae | Position and movement across the back |
| Spine | Central connection and curvature |
| Pelvis | Tilt, rotation and width |
| Iliac crest | Upper pelvic landmark |
| Pectorals | Chest mass and arm connection |
| Abdominals | Front abdominal plane |
| Obliques | Side transition between ribs and pelvis |
| Latissimus dorsi | Major lateral/back mass |
| Trapezius | Upper-back and neck transition |
| Erector spinae | Long vertical back forms |
Frequently Asked Questions
What is human torso anatomy for artists?
Human torso anatomy for artists is the study of the bones, muscles, landmarks and three-dimensional forms that create the visible structure of the chest, abdomen, back and pelvis. The goal is to understand how these structures affect proportion, movement and surface appearance.
What are the most important torso structures to learn first?
Start with the rib cage, pelvis and spine. Then learn major surface landmarks and large muscle groups. This gives you a structural foundation before you study smaller anatomical details.
How do artists simplify the human torso?
Artists commonly simplify the torso into major three-dimensional masses, especially the rib cage and pelvis, connected by the spine and softer abdominal region. These simplified forms make it easier to construct the figure from different angles.
How many heads long is the human torso?
There is no universal anatomical number. Head-unit measurements are drawing conventions that vary between artists and figure-drawing systems. Use them as proportional guides and compare them with the actual reference.
What are the most important torso landmarks for drawing?
Useful landmarks include the clavicles, sternal notch, sternum, xiphoid process, costal margin, navel, iliac crest, ASIS, scapulae and sacrum.
Why are the rib cage and pelvis important in figure drawing?
They establish the two major structural masses of the torso. Their relative tilt and rotation help determine the figure’s gesture, balance and three-dimensional orientation.
How do you draw a twisting torso?
First establish the rib cage and pelvis as separate masses. Rotate them independently, connect them through the spine, then adjust the compressed and stretched sides of the torso. Add muscles only after the underlying forms are convincing.
What muscles should artists learn for torso anatomy?
Prioritize the pectoralis major, rectus abdominis, external oblique, serratus anterior, latissimus dorsi, trapezius and erector spinae. These have significant influence on the visible torso surface.
Why is pelvis anatomy important for drawing the torso?
The pelvis establishes the lower anchor of the torso. Its tilt and rotation affect the waist, abdomen, spine and relationship between the upper body and legs.
Should artists memorize male and female torso proportions?
Common causes include treating the torso as a two-dimensional shape, failing to rotate the rib cage and pelvis, ignoring side planes, or drawing muscles without establishing the underlying forms.
Should artists memorize male and female torso proportions?
Not as rigid formulas. General anatomical differences can help with observation, but individual bodies vary substantially. Reference should always take priority over stereotyped proportions.
How do you draw a torso in foreshortening?
Treat the torso as a three-dimensional volume. Establish the near and far parts of the rib cage and pelvis, then use perspective and overlap to show depth rather than relying on normal front-view measurements.
Should I learn muscles or skeleton first?
Learn the major skeletal masses and landmarks first, especially the rib cage, pelvis and spine. Then add the large muscle groups that wrap around them.
What is the best torso drawing order?
A reliable sequence is:
Gesture → rib cage → pelvis → spine → landmarks → major muscles → silhouette → perspective → detail.
Should I draw every rib and abdominal muscle?
No. For most figure drawings, simplified structural forms communicate anatomy better than excessive anatomical lines. Add detail only when it contributes to the pose, form or intended level of realism.
